Introduction
Proper camera alignment and correct zero position setup are essential for achieving accurate and repeatable scan results with the Area Scan Portal. An incorrectly aligned camera or an incorrect zero position can lead to distorted contours, measurement inaccuracies, or unexpected alarm states during operation.
This section explains how to:
- Precisely align the ptical axis of the camera perpendicular to the LED panel (scanning area)
- Manually set the zero position when it has been changed unintentionally
Following these procedures ensures optimal system performance, reliable contour extraction, and consistent measurement accuracy.
Requirements
- An Area Scan Portal system is required to perform the camera alignment procedure.
- To set up the zero position, an active ContourTrace Premium subscription and an Area Scan Portal – Automatic Operation (ASP-AO) system are required.
Camera Alignment Procedure
Follow the steps below to achieve optimal camera alignment:
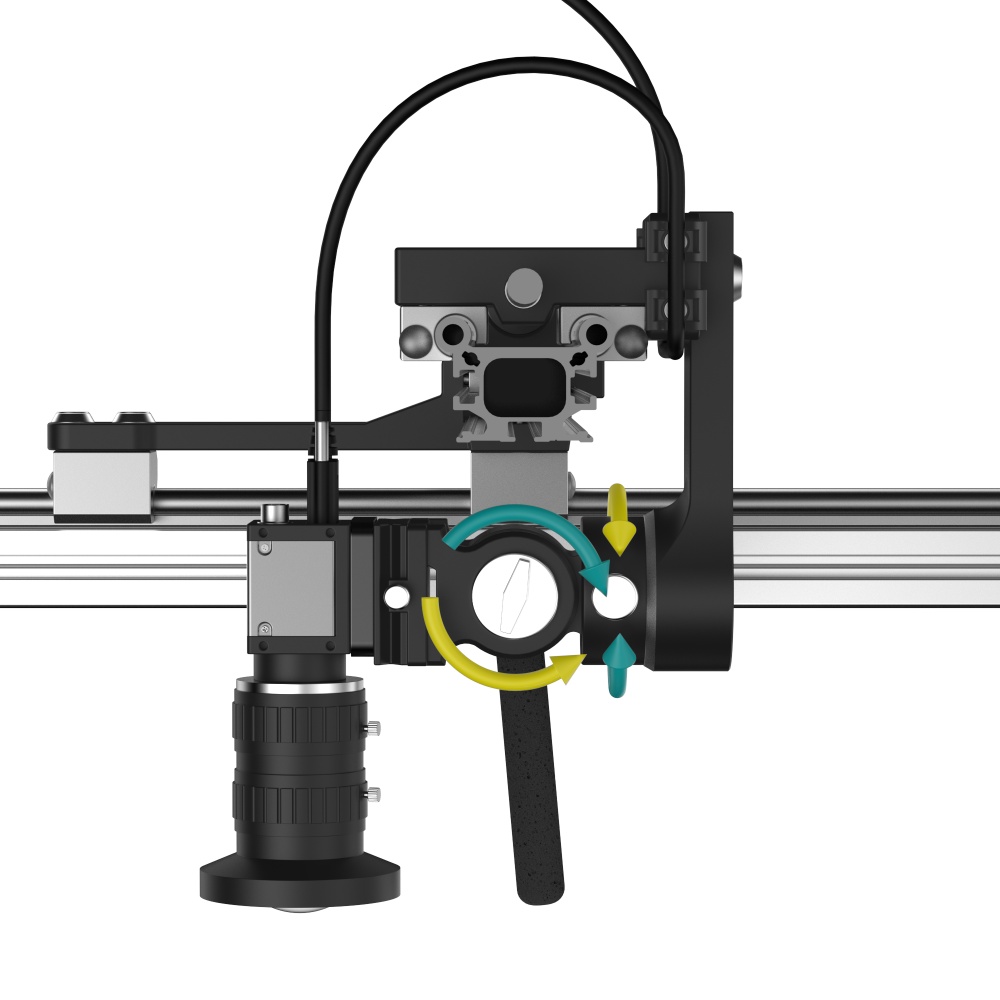
- Place the Mirror
Place the supplied mirror flat on the workspace surface. The mirror serves as a reference plane for accurate camera alignment. - Position the Camera
Place the mirror directly beneath the camera lens on the LED light plate. Ensure the camera is oriented straight toward the mirror surface. - Use the Levelling Device
Use the levelling device provided with the Area Scan Portal to make fine adjustments to the camera orientation. - Adjust the Camera Angle
Carefully adjust the camera angle using the levelling device until the reflected image of the camera lens appears centered in the Galaxy Viewer. - Confirm Alignment
When the center of the reflected lens image is perfectly centered in the Galaxy Viewer, the camera alignment is complete. At this point, the mirror plane is perpendicular to the optical axis of the lens.
Tips for Optimal Camera Alignment
Patience and precision: Make small, controlled adjustments to achieve accurate alignment.
Setting the Origin of the ASP-AO
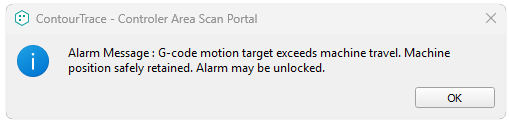
⚠️ 重要:You only need to perform this procedure if the origin was accidentally changed. In this case, you will see the message illustrated in the image below during operation.
Before proceeding, ensure that the camera is properly aligned.
Step 1: Restore the Connection (Only if the Machine Is in Alarm State)
-
If the machine is currently in an alarm state, disconnect the machine.
-
Reconnect the machine and allow it to complete initialization.
-
If the machine is not in an alarm state, skip this step and proceed to Step 3.

Step 2: Home the Machine
-
Use the software to home (reference) the machine.
-
Wait until the homing process is completed successfully.

Step 2: Manually Position the Camera
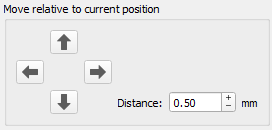
- In the software, use the “Move relative to current position” option.
-
Carefully move the camera until the green crosshair is precisely aligned with the top-right position marker, as shown in the reference image.
- Make small adjustments to ensure accurate alignment.

⚠️ 重要: If the machine enters an alarm state during this step, return to Step 1 and repeat the procedure.
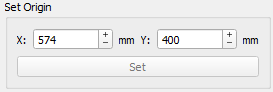
Step 3: Set the Origin Coordinates
-
In the “Set Origin” section, enter the following values:
-
X = 574
-
Y = 400
-
-
Click “Set” to confirm.
Once these steps are completed, the origin is successfully set and the machine is ready for normal operation.